Thursday, 12 April 2018

Deploying Mule Application into Multiple Environments

This is a quick note. There are plenty of other online resources discussing the same topic. I want to list the steps in one place, so it’s easier for anyone who wants to follow this practice.
In a typical software development life cycle, a project needs to be deployed to multiple environments. Mule project is no exception.
Mule project uses java property files and JVM environment variables to manage project deployment to multiple environments. This solution has several parts.
  1. Property files are created for each environment to store target specific parameters, typical file names are like
mule-app-dev.properties,
mule-app-qa.properties
mule-app-prod.properties
The property names are common in these files. The property values vary depends on the environment. For example, we may have two properties “db.host” and “db.port” define as something like:
mule-app-dev.properties:
db.host=localhost
db.port=1001
mule-app-test.properties
db.host=testdb.mycompany.com
db.host=3069
  1. In the source code the property will simply be referenced like:
<set-variable variableName=“host” value=“${db.host}” doc:name=“var”/>
<logger message=“port=${db.port}” level=“INFO” doc:name=“logger”/>
An environment variable is defined, for example, “env=dev” that allows the server to determine which environment the application is being deployed to, and therefore pick up the proper property files at runtime for the target platform.
  1. With Anypoint Studio, this is often defined inside mule-app.properties
  2. With on-prem server, it can be defined on the server start up command line like
-M-Denv=dev
This “-M-D” is a special way for Mule to pass properties to the JVM that runs Mule engine.
If your Mule ESB is configured as service, you can locate the startup script and add “-M-Denv=xxx” for each environment.
3. With Cloudhub, when you deploy the application, you choose which environment to deploy to, then on the deployment page, there is a “properties” tab next to “runtime”. From there, you can simply set the “env” property, for example, to “env=prod”.
  1. In a Mule/Flow configuration file (normally it’s in a common global config file), the property files are referenced as
<context:property-placeholder location="mule-app-${env}.properties"/>
This line will automatically become one of the following files depends on the ${env} setting:
<context:property-placeholder location="mmule-app-dev.properties" />
<context:property-placeholder location="mule-app-test.properties" />
<context:property-placeholder location="mule-app-prod.properties"/>
With this setup, the developer doesn’t have to worry about which environment the application will be deployed to. The source code stays exactly the same for all environment. The admin who deploys the application decides which target environment to deploy the application to.

Thursday, 5 April 2018

Automate the Process of your CloudHub application logs

CloudHub is MuleSoft’s integration platform as a service (iPaaS) that enables the deployment and management of integration solutions in the cloud. Runtime Manager, CloudHub’s management tool,  provides an integrated set of logging tools that allow support and operations staff to monitor and troubleshoot application logs of deployed applications.
Currently, application log entries are kept for 30 days or until they reach a max size of 100 MB. Often we are required to keep these logs for greater periods of time for auditing or archiving purposes. Overly chatty applications (applications that write log entries frequently) may find their logs only covering a few days restricting the troubleshooting window even further. Runtime Manager allows portal users to manually download log files via the browser, however no automated solution is provided out-of-the-box.
The good news is, the platform does provide both a command line tool and management API that we can leverage. Leaving the CLI to one side for now, the platform’s management API looks promising. Indeed, a search in Anypoint Exchange also yields a ready built CloudHub Connector we could leverage. However upon further investigation, the connector doesn’t meet all our requirements. The CloudHub Connector does not appear to support different business groups and environments so using it to download logs for applications deployed to non-default environments will not work (at least in the current version). The best approach will be to consume the management APIs provided by the Anypoint Platform directly. RAML definitions have been made available making consuming them within a mule flow very easy.
Solution overview
In this post we’ll develop a CloudHub application that is triggered periodically to loop through a collection of target applications, connect to the Anypoint Management APIs and fetch the current application log for each deployed instance. The downloaded logs will be compressed and sent to an Amazon S3 bucket for archiving.
solution_view
Putting the solution together:
We start by grabbing the RAML for both the Anypoint Access Management API and the Anypoint Runtime Manager API and bring them into the project. The Access Management API provides the authentication and authorisation operations to login and obtain an access token needed in subsequent calls to the Runtime Manager API. The Runtime Manager API provides the operations to enumerate the deployed instances of an application and download the application log.
Download and add the RAML definitions to the project by extracting them into the ~/src/main/api folder.
raml_defs
To consume these APIs we’ll use the HTTP connector so we need to define some global configuration elements that make use of the RAML definitions we just imported.
http_config
Note: Referencing these directly from Exchange currently throws some RAML parsing errors.
exchange_error
So to avoid this, we download manually and reference our local copy of the RAML definition. Obviously we’ll need to update this as the API definition changes in the future.
To provide simple multi-value configuration support I have used a simple JSON structure to describe a collection of applications we need to iterate over.
{
"config": [{
"anypointApplication": "myDeployedApp-1",
"anypointEnvironmentId": "<environment id gathered from Anypoint CLI>",
"amazonS3Bucket": "<S3 bucket name>"
},
{
"anypointApplication": "myDeployedApp-2",
"anypointEnvironmentId": "<environment id gathered from Anypoint CLI>",
"amazonS3Bucket": "<S3 bucket name>"
}]
}
  
Our flow then reads in this config and transforms this into a HashMap that we can then iterate over.
Note: Environment IDs can be gathered using the Runtime Manager API or the Anypoint CLI
cli_environments
Next, create our top level flow that is triggered periodically to read and parse our configuration setting into a collection that we can iterate over to download the application logs.
entry_point_flow
<flow name="logArchiverFlow">
<poll doc:name="Poll">
<fixed-frequency-scheduler frequency="${polling.frequency.hours}" timeUnit="HOURS"/>
<set-payload value="#['${log.achiver.config}']" mimeType="application/json" doc:name="Read config"/>
</poll>
<json:json-to-object-transformer returnClass="java.util.HashMap" doc:name="JSON to Object"/>
<set-variable variableName="configCollection" value="#[payload.config]" doc:name="Set configCollection flowVar"/>
<foreach collection="#[flowVars.configCollection]" counterVariableName="configCounter" doc:name="For Each item in Config">
<set-variable variableName="config" value="#[flowVars.configCollection[configCounter-1]]" doc:name="Set config flowVar"/>
<logger message="#['Archiving log files for CloudHub application: &quot;' + flowVars.config.anypointApplication + '&quot; to Amazon S3 bucket: &quot;' + flowVars.config.amazonS3Bucket + '&quot;...']" level="INFO" doc:name="Logger"/>
<flow-ref name="archiveLogFile" doc:name="archiveLogFile"/>
</foreach>
<catch-exception-strategy doc:name="Catch Exception Strategy">
<logger level="ERROR" doc:name="Logger"/>
</catch-exception-strategy>
</flow>
vNow, we create a sub-flow that describes the process of downloading application logs for each deployed instance. We first obtain an access token using the Access Management API and present that token to the Runtime Manager API to gather details of all deployed instances of the application. We then iterate over that collection and call the Runtime Manager API to download the current application log for each deployed instance.
archive_log_file
<sub-flow name="archiveLogFile">
<flow-ref name="cloudhubLogin" doc:name="cloudhubLogin"/>
<flow-ref name="cloudhubDeployments" doc:name="cloudhubDeployments"/>
<foreach collection="#[flowVars.instances]" counterVariableName="instanceCounter" doc:name="For Each deployed instance">
<set-variable variableName="instanceId" value="#[flowVars.instances[flowVars.instanceCounter-1].instanceId]" doc:name="Set InstanceId flowVar"/>
<flow-ref name="cloudhubLogFiles" doc:name="cloudhubLogFiles"/>
</foreach>
</sub-flow>
 
Next we add the sub-flows for consuming the Anypoint Platform APIs for each of the in-scope operations
cloudhubLogin
<sub-flow name="cloudhubLogin">
<set-payload value="#['{ &quot;username&quot;: &quot;${anypoint.login.username}&quot;, &quot;password&quot;: &quot;${anypoint.login.password}&quot;}']" mimeType="application/json" doc:name="Set Payload"/>
<http:request config-ref="Access_Management_Config" path="/login" method="POST" doc:name="HTTP"/>
<json:json-to-object-transformer doc:name="JSON to Object" returnClass="java.util.HashMap"/>
<set-variable variableName="access_token" value="#[payload.access_token]" doc:name="Set Access_Token FlowVar"/>
<logger level="DEBUG" doc:name="Logger"/>
</sub-flow>

 
cloudhubDeployments
<sub-flow name="cloudhubDeployments">
<set-payload value="{}" mimeType="application/json" doc:name="Set Payload"/>
<http:request config-ref="CloudHub_Config" path="/v2/applications/{domain}/deployments" method="GET" doc:name="HTTP">
<http:request-builder>
<http:uri-param paramName="domain" value="#[flowVars.config.anypointApplication]"/>
<http:header headerName="X-ANYPNT-ENV-ID" value="#[flowVars.config.anypointEnvironmentId]"/>
<http:header headerName="Authorization" value="#['Bearer ' + flowVars.access_token]"/>
</http:request-builder>
</http:request>
<json:json-to-object-transformer doc:name="JSON to Object" returnClass="java.util.HashMap"/>
<set-variable variableName="instances" value="#[payload.data[0].instances]" doc:name="Set Instances FlowVar"/>
<logger level="DEBUG" doc:name="Logger"/>
</sub-flow>

cloudhublogfiles
<sub-flow name="cloudhubLogFiles">
<set-payload value="{}" mimeType="application/json" doc:name="Set Payload"/>
<http:request config-ref="CloudHub_Config" path="/v2/applications/{domain}/instances/{instanceId}/log-file" method="GET" doc:name="HTTP">
<http:request-builder>
<http:uri-param paramName="domain" value="#[flowVars.config.anypointApplication]"/>
<http:uri-param paramName="instanceId" value="#[flowVars.instanceId]"/>
<http:header headerName="X-ANYPNT-ENV-ID" value="#[flowVars.config.anypointEnvironmentId]"/>
<http:header headerName="Authorization" value="#['Bearer ' + flowVars.access_token]"/>
</http:request-builder>
</http:request>
<transformer ref="customZipTransformer" doc:name="ZIP before sending"/>
<s3:create-object config-ref="Amazon_S3_Configuration" bucketName="#[flowVars.config.amazonS3Bucket]" key="#[flowVars.config.anypointApplication + '-' + flowVars.instanceId + '-' + server.dateTime + '.zip']" doc:name="Amazon S3"/>
</sub-flow>

In this last sub-flow, we perform an additional processing step of compressing (zip) the log file before sending to our configured Amazon S3 bucket.
The full configuration for the workflow can be found below


<?xml version="1.0" encoding="UTF-8"?>

<mule xmlns:batch="http://www.mulesoft.org/schema/mule/batch" xmlns:s3="http://www.mulesoft.org/schema/mule/s3" xmlns:json="http://www.mulesoft.org/schema/mule/json" xmlns:http="http://www.mulesoft.org/schema/mule/http" xmlns:cloudhub="http://www.mulesoft.org/schema/mule/cloudhub" xmlns:tracking="http://www.mulesoft.org/schema/mule/ee/tracking" xmlns="http://www.mulesoft.org/schema/mule/core" xmlns:doc="http://www.mulesoft.org/schema/mule/documentation"
 xmlns:spring="http://www.springframework.org/schema/beans" 
 xmlns:xsi="http://www.w3.org/2001/XMLSchema-instance"
 xsi:schemaLocation="http://www.springframework.org/schema/beans http://www.springframework.org/schema/beans/spring-beans-current.xsd
http://www.mulesoft.org/schema/mule/core http://www.mulesoft.org/schema/mule/core/current/mule.xsd
http://www.mulesoft.org/schema/mule/http http://www.mulesoft.org/schema/mule/http/current/mule-http.xsd
http://www.mulesoft.org/schema/mule/ee/tracking http://www.mulesoft.org/schema/mule/ee/tracking/current/mule-tracking-ee.xsd
http://www.mulesoft.org/schema/mule/cloudhub http://www.mulesoft.org/schema/mule/cloudhub/current/mule-cloudhub.xsd
http://www.mulesoft.org/schema/mule/json http://www.mulesoft.org/schema/mule/json/current/mule-json.xsd
http://www.mulesoft.org/schema/mule/s3 http://www.mulesoft.org/schema/mule/s3/current/mule-s3.xsd
http://www.mulesoft.org/schema/mule/batch http://www.mulesoft.org/schema/mule/batch/current/mule-batch.xsd">
    
    <custom-transformer name="customZipTransformer" class="kloud.cloudhub.logarchiver.transformers.ZipTransformer" doc:name="Java"/>
    
    <http:request-config name="Access_Management_Config" protocol="HTTPS" host="anypoint.mulesoft.com" port="443" basePath="/accounts" doc:name="HTTP Request Configuration">
        <http:raml-api-configuration location="access_management/api.raml"/>
    </http:request-config>
    <http:request-config name="CloudHub_Config" protocol="HTTPS" host="anypoint.mulesoft.com" port="443" basePath="/cloudhub/api" doc:name="HTTP Request Configuration">
        <http:raml-api-configuration location="cloudhub/api.raml"/>
    </http:request-config>
    <s3:config name="Amazon_S3_Configuration" accessKey="${amazon.s3.access_key}" secretKey="${amazon.s3.secret_key}" doc:name="Amazon S3 Configuration"/>
    <flow name="logArchiverFlow">
        <poll doc:name="Poll">
            <fixed-frequency-scheduler frequency="${polling.frequency.hours}" timeUnit="HOURS"/>
            <set-payload value="#['${log.achiver.config}']" mimeType="application/json" doc:name="Read config"/>
        </poll>
        <json:json-to-object-transformer returnClass="java.util.HashMap" doc:name="JSON to Object"/>
        <set-variable variableName="configCollection" value="#[payload.config]" doc:name="Set configCollection flowVar"/>
        <foreach collection="#[flowVars.configCollection]" counterVariableName="configCounter" doc:name="For Each item in Config">
            <set-variable variableName="config" value="#[flowVars.configCollection[configCounter-1]]" doc:name="Set config flowVar"/>
            <logger message="#['Archiving log files for CloudHub application: &quot;' + flowVars.config.anypointApplication + '&quot; to Amazon S3 bucket: &quot;' + flowVars.config.amazonS3Bucket + '&quot;...']" level="INFO" doc:name="Logger"/>
            <flow-ref name="archiveLogFile" doc:name="archiveLogFile"/>
        </foreach>
        <catch-exception-strategy doc:name="Catch Exception Strategy">
            <logger level="ERROR" doc:name="Logger"/>
        </catch-exception-strategy>
    </flow>
    <sub-flow name="archiveLogFile">
        <flow-ref name="cloudhubLogin" doc:name="cloudhubLogin"/>
        <flow-ref name="cloudhubDeployments" doc:name="cloudhubDeployments"/>
        <foreach collection="#[flowVars.instances]" counterVariableName="instanceCounter" doc:name="For Each deployed instance">
            <set-variable variableName="instanceId" value="#[flowVars.instances[flowVars.instanceCounter-1].instanceId]" doc:name="Set InstanceId flowVar"/>
            <flow-ref name="cloudhubLogFiles" doc:name="cloudhubLogFiles"/>
        </foreach>
    </sub-flow>
    
    <sub-flow name="cloudhubLogin">
        <set-payload value="#['{ &quot;username&quot;: &quot;${anypoint.login.username}&quot;,  &quot;password&quot;: &quot;${anypoint.login.password}&quot;}']" mimeType="application/json" doc:name="Set Payload"/>
        <http:request config-ref="Access_Management_Config" path="/login" method="POST" doc:name="HTTP"/>
        <json:json-to-object-transformer doc:name="JSON to Object" returnClass="java.util.HashMap"/>
        <set-variable variableName="access_token" value="#[payload.access_token]" doc:name="Set Access_Token FlowVar"/>
        <logger level="DEBUG" doc:name="Logger"/>
    </sub-flow>
    
    <sub-flow name="cloudhubDeployments">
        <set-payload value="{}" mimeType="application/json" doc:name="Set Payload"/>
        <http:request config-ref="CloudHub_Config" path="/v2/applications/{domain}/deployments" method="GET" doc:name="HTTP">
            <http:request-builder>
                <http:uri-param paramName="domain" value="#[flowVars.config.anypointApplication]"/>
                <http:header headerName="X-ANYPNT-ENV-ID" value="#[flowVars.config.anypointEnvironmentId]"/>
                <http:header headerName="Authorization" value="#['Bearer ' + flowVars.access_token]"/>
            </http:request-builder>
        </http:request>
        <json:json-to-object-transformer doc:name="JSON to Object" returnClass="java.util.HashMap"/>
        <set-variable variableName="instances" value="#[payload.data[0].instances]" doc:name="Set Instances FlowVar"/>
        <logger level="DEBUG" doc:name="Logger"/>
    </sub-flow>
        
    <sub-flow name="cloudhubLogFiles">
        <set-payload value="{}" mimeType="application/json" doc:name="Set Payload"/>
        <http:request config-ref="CloudHub_Config" path="/v2/applications/{domain}/instances/{instanceId}/log-file" method="GET" doc:name="HTTP">
            <http:request-builder>
                <http:uri-param paramName="domain" value="#[flowVars.config.anypointApplication]"/>
                <http:uri-param paramName="instanceId" value="#[flowVars.instanceId]"/>
                <http:header headerName="X-ANYPNT-ENV-ID" value="#[flowVars.config.anypointEnvironmentId]"/>
                <http:header headerName="Authorization" value="#['Bearer ' + flowVars.access_token]"/>
            </http:request-builder>
        </http:request>
        <transformer ref="customZipTransformer" doc:name="ZIP before sending"/>
        <s3:create-object config-ref="Amazon_S3_Configuration" bucketName="#[flowVars.config.amazonS3Bucket]" key="#[flowVars.config.anypointApplication + '-' + flowVars.instanceId + '-' + server.dateTime + '.zip']" doc:name="Amazon S3"/>
    </sub-flow>
</mule>
Once packaged and deployed to CloudHub we configure the solution to archive application logs for any deployed CloudHub app, even if they have been deployed into environments other than the one hosting the log archiver solution.
After running the solution for a day or so and checking the configured storage location we can confirm logs are being archived each day.


Known limitations:
  • The Anypoint Management API does not allow downloading application logs for a given date range. That is, each time the solution runs a full copy of the application log will be downloaded. The API does support an operation to query the logs for a given date range and return matching entries as a result set but that comes with additional constraints on result set size (number of rows) and entry size (message truncation).
  • The RAML definitions in Anypoint Exchange currently do not parse correctly in Anypoint Studio. As mentioned above, to work around this we download the RAML manually and bring it into the project ourselves.
  • Credentials supplied in configuration are in plain text. Suggest creating a dedicated Anypoint account and granting permissions to only the target environments.
In this post I have outlined a solution that automates the archiving of your CloudHub application log files to external cloud storage. The solution allows periodic scheduling and multiple target applications to be configured even if they exist in different CloudHub environments. Deploy this solution once to archive all of your deployed application logs.

Wednesday, 4 April 2018

How to Create a REST API Proxy in Mulesoft ESB

We often expose the proxy APIs that connect applications to their backend APIs. With a proxy API, the application continues to run without issue and continues to call and connect to the backend API while a developer is editing it. Exposing a proxy API also protects the backend API from the world, shielding the real IP address.
The advantage of using a proxy is having a layer of separation to ensure that any attacks against our API are stopped well before anyone interacts with our main servers. This creates extra protection for our existing APIs.
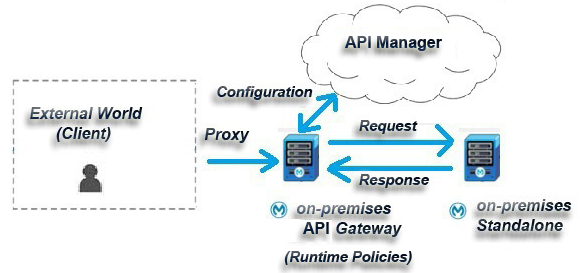
API Gateway acts as a proxy server that is dedicated to hosting the proxy applications and for Lightning Connect to gather all the existing backend APIs together which are either hosted in our on-premises standalone server or CloudHub.
The advantage of API Gateway is that it automatically creates an application that can proxy the backend API from the URL that the backend API exposes, and we do not need to write any code for it. Not only that, through API Manager, we can implement various runtime policies on HTTP/HTTPS endpoints to govern our proxy API.
API Gateway solution is also very versatile, as it can be implemented both in CloudHub as well as in on-premises.
Here we will demonstrate implementing a proxy application on an on-premises Data Gateway server that will connect/communicate with a backend API that is deployed on an on-premises standalone server with a runtime policy.
Image title
First, we start the demonstration by creating a simple application in our studio and deploying it on our on-premises standalone server. We then create our proxy application in the API Manager interface, apply the required policies on it, and finally deploy the proxy application to an on-premises API Gateway in our system.

Creating and Deploying Application

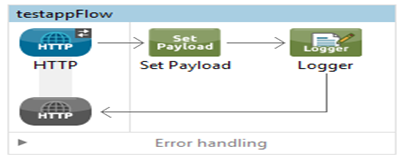
So, let’s create a sample application in our studio as follows:
Image title
Once it is finished, we create a Mule application deployable zip file as follows:
Image title
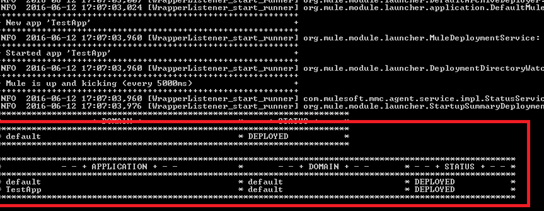
After the zip file is created we will copy the zip file in the {MULE_HOME}/apps folder and deploy the application in the on-premises standalone server as follows:
Image title
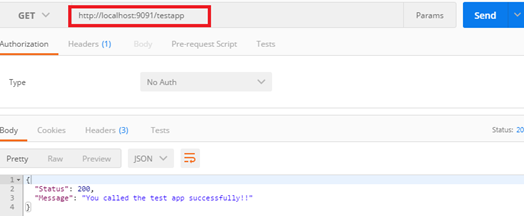
Now, if we test our application on a REST client like Postman, we can see the following responses with the following URL http://localhost:9091/testapp :
Image title
This means our backend application is ready and running successfully on an on-premises standalone server!

Creating Proxy Application for Standalone Data Gateway Server

Now as our backend service is ready and running on an on-premises standalone server, we don’t want to expose this API URL to the world. Instead, we can deploy a proxy service to our on-premises proxy server which we can then finally expose to the outside world. Additionally, we should apply some policies or rules with this proxy URL that is exposed to the client.
We will be configuring the proxy application, and it’s policies via the API Manager interface. To begin the process, we need to log in to our Anypoint Platform account to access the interface.

Creating a Proxy Application

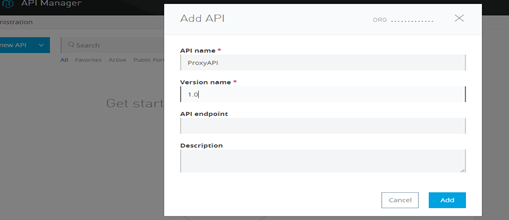
We need to go to the API Manager and create an API as follows:
Image title
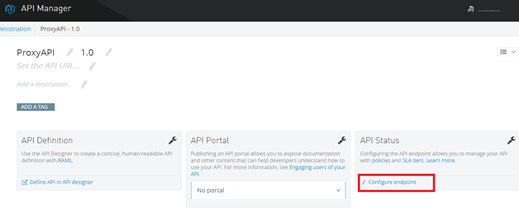
After we create an API, we will see that API Manager provided an option to configure our endpoints:
Image title
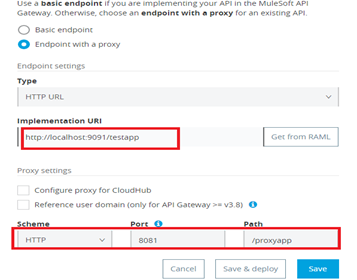
As we select the configure endpoint option, we will find options like implementation URI asking for a backend service URL and down the line port and path for the proxy application:
Image title

Adding On-Premises DataGateway Server to CloudHub

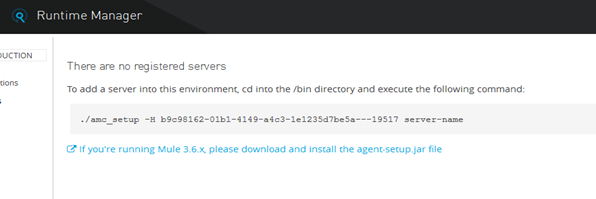
In the server section we can add our on-premises Data Gateway server with the Runtime Manager interface:
Image title
Now we move to the /bin folder of our on-premises Data Gateway server located in our system and add the above-given command in command prompt and execute it as follows:
Image title
Now, we will find that our Data Gateway is successfully added to our Runtime Manager interface as below:
Image title
So, if we start our on-premises Data Gateway server in our system it will reflect in our Runtime Manager interface as below:
Image title

Applying Policies to Our Proxy Application

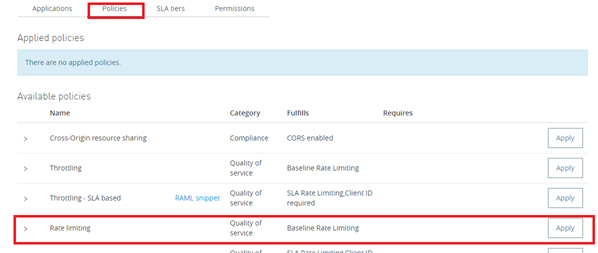
Now, back to the API Manager where we configured our proxy application, we will find an option to apply different policies on it.
A policy is a mechanism/rule for enforcing filters on traffic. These filters are used to control things like authentication, access, allotted consumption, and SLAs. There can be custom policies or some pre-built policies like Rate Limiting, Throttling, OAuth 2, Basic HTTP Authentication, and etc… for APIs:
Image title
We are going to apply the Rate Limiting policy on our proxy application as shown above.
The Rate Limiting policy specifies the maximum value for the number of messages processed per period and rejects any messages beyond the maximum. Therefore, it will apply rate limiting to all API calls regardless of the source and thus control our proxy API.
Image title
So, here we will configure two requests for our proxy API per minute as we can see above.

Deploying Proxy Application From API Manager Interface to On-Premises Server Directly

After applying the Rate Limiting policy, we will deploy the proxy application from API Manager interface to directly our on-premises Data Gateway server by selecting Deploy Proxy option we can see below:
Image title
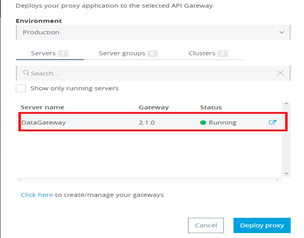
We need to select our on-premises Data Gateway proxy server which is just registered with the API Manager interface and then we need to click Deploy Proxy button as shown below:
Image title
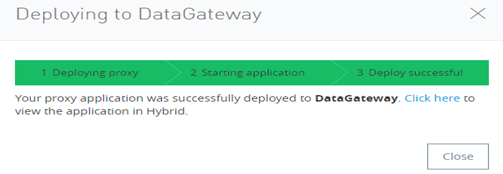
The API Manager interface will directly deploy our proxy application to our on-premises Data Gateway server located in our system and will show the status as follows:
Image title
We can also see the change in our system in the Gateway server console:
Image title

Testing Our Proxy API

In the final stage, we will now test our proxy application deployed in our proxy server as well as the policy/rule applied on it.
So, we will hit the proxy URL: http://localhost:8081/proxyapp on a REST client like Postman as follows and see the result:
Image title
And voila! We are getting the response from our backend API!

Testing the Rule Applied on Proxy API

As we already implemented a Rate Limiting policy on our proxy API, if we hit more than two requests per minute we will get the following restriction below:
Image title

Adding Version

API Manager has a major feature of adding versions to our proxy APIs. This helps to maintain backward compatibility across different API versions. We can also add different versions of our proxy APIs, each of which will be compatible with former versions of the backend API:
Image title

Conclusion

As you can see, we were able to easily create a proxy application for our backend application and apply various rules over it without writing a single line of code! API Gateway acts as a proxy server brilliantly and helps us create and control our proxy application without putting additional effort in writing more code. Moreover, the Runtime Manager interface can add and control our on-premises server and can deploy applications directly from there with minimum effort! Another important aspect of most gateway vendors are is that they force us to transit our traffic through *their* premises while API Gateway doesn’t. In this case, it doesn’t require API traffic to flow through a third party in the cloud, but instead only goes directly through on-premises servers. The cloud aspect is only for management and control.

NetSuite OpenAir Connector in Mule

NetSuite OpenAir has over 1,500 customers and is a widely used professional services automation software (PSA). Internally, we also use OpenAir and have over 100 users who are registered in the system.
At MuleSoft, we have two user stories for OpenAir:
  • As a Solutions Architect, I’d like to send my Google Calendar information to OpenAir, so that I don’t have to enter timesheets manually.
  • As a Finance Manager, I’d like to send information about a new worker from Workday or NetSuite to OpenAir, so that I don’t have to manually provision workers whenever a new employee joins the Services Team.
One of our rockstar Solutions Architects at MuleSoft implemented the Google Calendar to OpenAir integration by using the NetSuite OpenAir Connector. Once the integration is in production, it is expected to save 30-40% of his time spent on logging timesheets. As a result, we could save more than 100 hours per month at MuleSoft. More metrics to come on this soon. Stay tuned!

Let’s get real

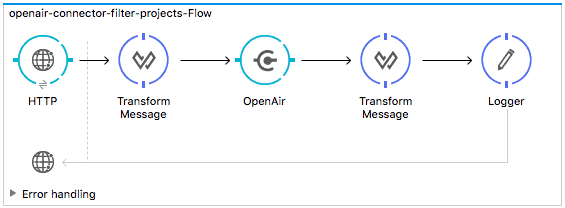
Let’s now go into a specific use case. Follow the steps below to learn how to get filtered project information from NetSuite OpenAir using the connector:

Screen Shot 2016-03-23 at 6.33.39 PM


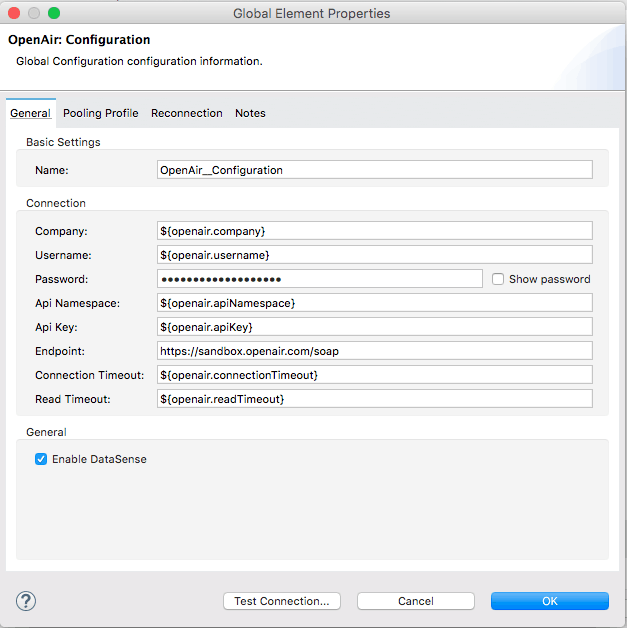
Step 1: Configure the connector

Screen Shot 2016-03-23 at 6.35.54 PM

In order to configure the connector, CompanyID, Username, Password, API Namespace,  API Key, and URL for your OpenAir environment are required, but Connection Timeout and Read Timeout are optional.


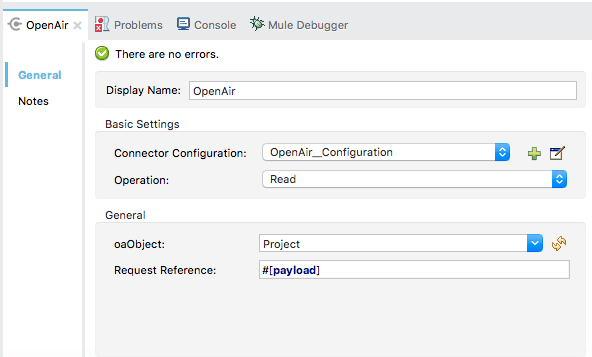
Step 2: Select an operation and oaObject

Screen Shot 2016-03-23 at 6.45.16 PM
Screen Shot 2016-03-23 at 6.48.49 PM

Once you select “Read” as an operation and “Project” as an oaObject, you can see from DataSense that the OpenAir Connector expects a XML-based request.

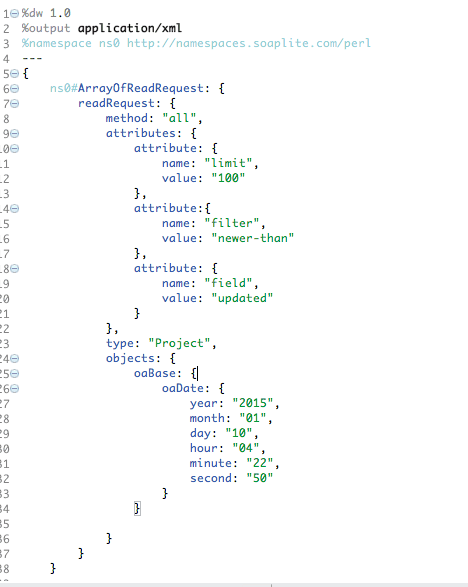
Step 3: Create an XML-based request with DataWeave

Screen Shot 2016-03-25 at 8.53.03 AM
Since the connector supports XML-based requests, DataWeave is a natural choice to submit the request. For those who are not familiar with DataWeave, the DataWeave Language is a powerful template engine that allows you to transform data to and from any kind of format (XML, CSV, JSON, Pojos, Maps, etc). To see filtered information for projects that have been updated since January 10, 2015, configure your XML request with the below setup.

Step 4: Receive the filtered project information

Once the above configuration is complete, the connector will only return projects updated after January 10, 2015.
….
           “copy_approvers”: “”,
           “sold_to_contact_id”: “0”,
           “auto_bill_override”: “”,
           “auto_bill”: “1”,
           “az_approver”: “0”,
           “prj_staffing_plan__c”: “”,
           “auto_bill_cap”: “”,
           “picklist_label”: “Honeycomb Services : Account audit template”,
           “rm_approvalprocess”: “0”,
           “copy_project_billing_rules”: “”,
           “filtersetids”: “3”,
           “notify_issue_closed_project_owner”: “”,
           “ta_approvalprocess”: “0”,
           “te_approvalprocess”: “0”,
           “prj_allow_expense__c”: “1”,
           “current_wip”: “0”,
           “updated”: “2015-06-08 18:03:54”,
           “id”: “7”,
           “auto_bill_cap_value”: “0.00”,
           “rv_approver”: “0”,
           “rv_approvalprocess”: “0”,
           “active”: “1”,
           “notify_issue_created_project_owner”: “”,
….
For new users, try the above example to get started, and for others, please share with us how you are planning to use the OpenAir connector!

Create Account In Salesforce

SalesForce Connector is a secure way of connecting to and accessing data from a Mule application. It handles all five ways of integrating Salesforce. It is capable of performing all of the operations exposed by SalesForce via four of their APIs.

Prerequisites

  • Create a SalesForce account if you don't have one.
  • Reset the security token.
    • Go to My Settings > Personal > Reset My Security Token. Click Reset Security Token and it will send a security token to your registered email.
Image title
We will discuss how to create account record in SalesForce using basic authentication from the Mule application.

Create Accounts View With Postal Code in Salesforce

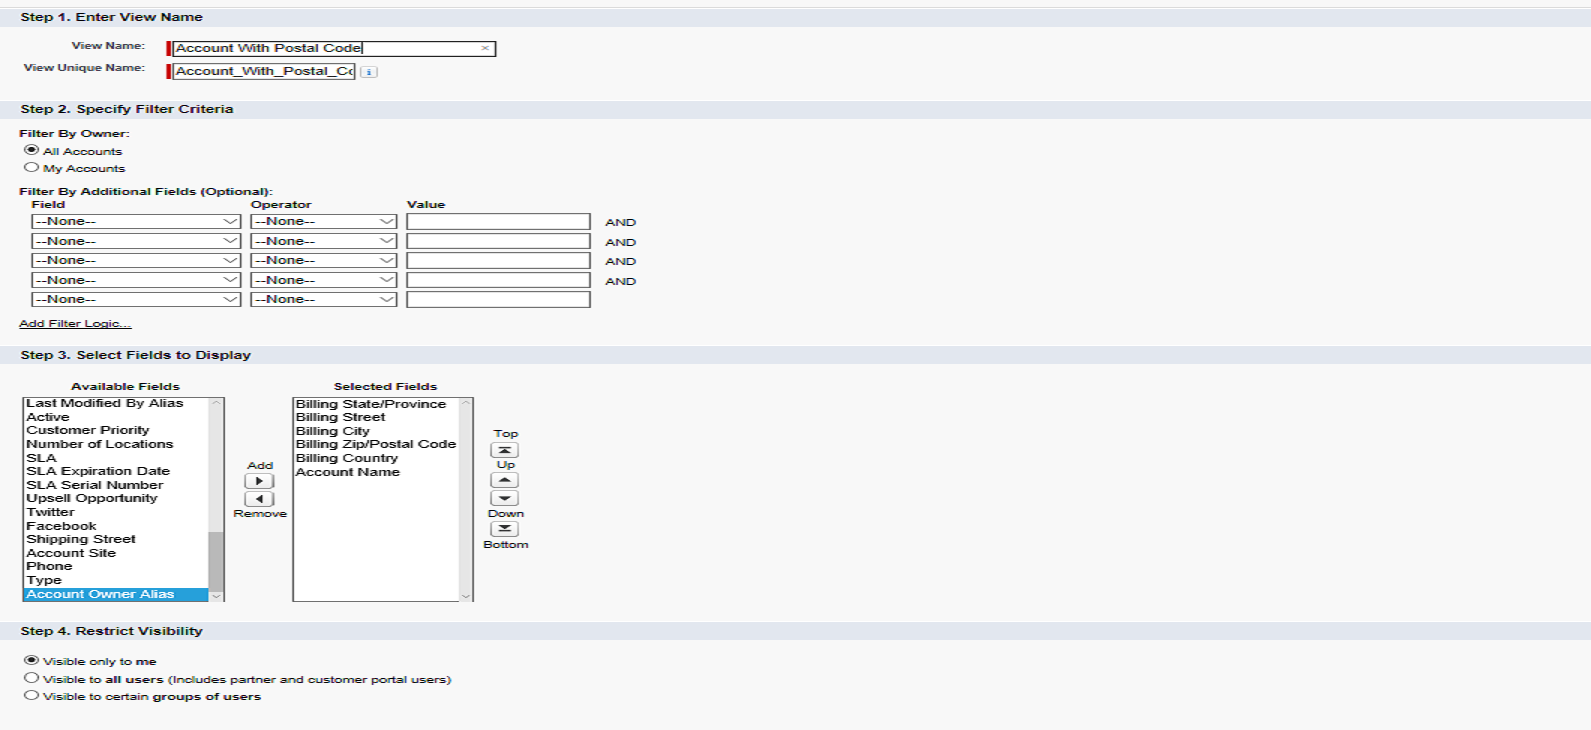
Log into Salesforce. Go to Accounts > Create New View. Enter the view name All Accounts with Postal Code and then go to Select Fields to Display.
Remove all default fields available in Selected Fields and add Billing State/Province, Billing Street, Billing City, Billing Zip/Postal Code, Billing Country, and Account Name.

Image titleDesigning the Mule Flow With Anypoint Studio
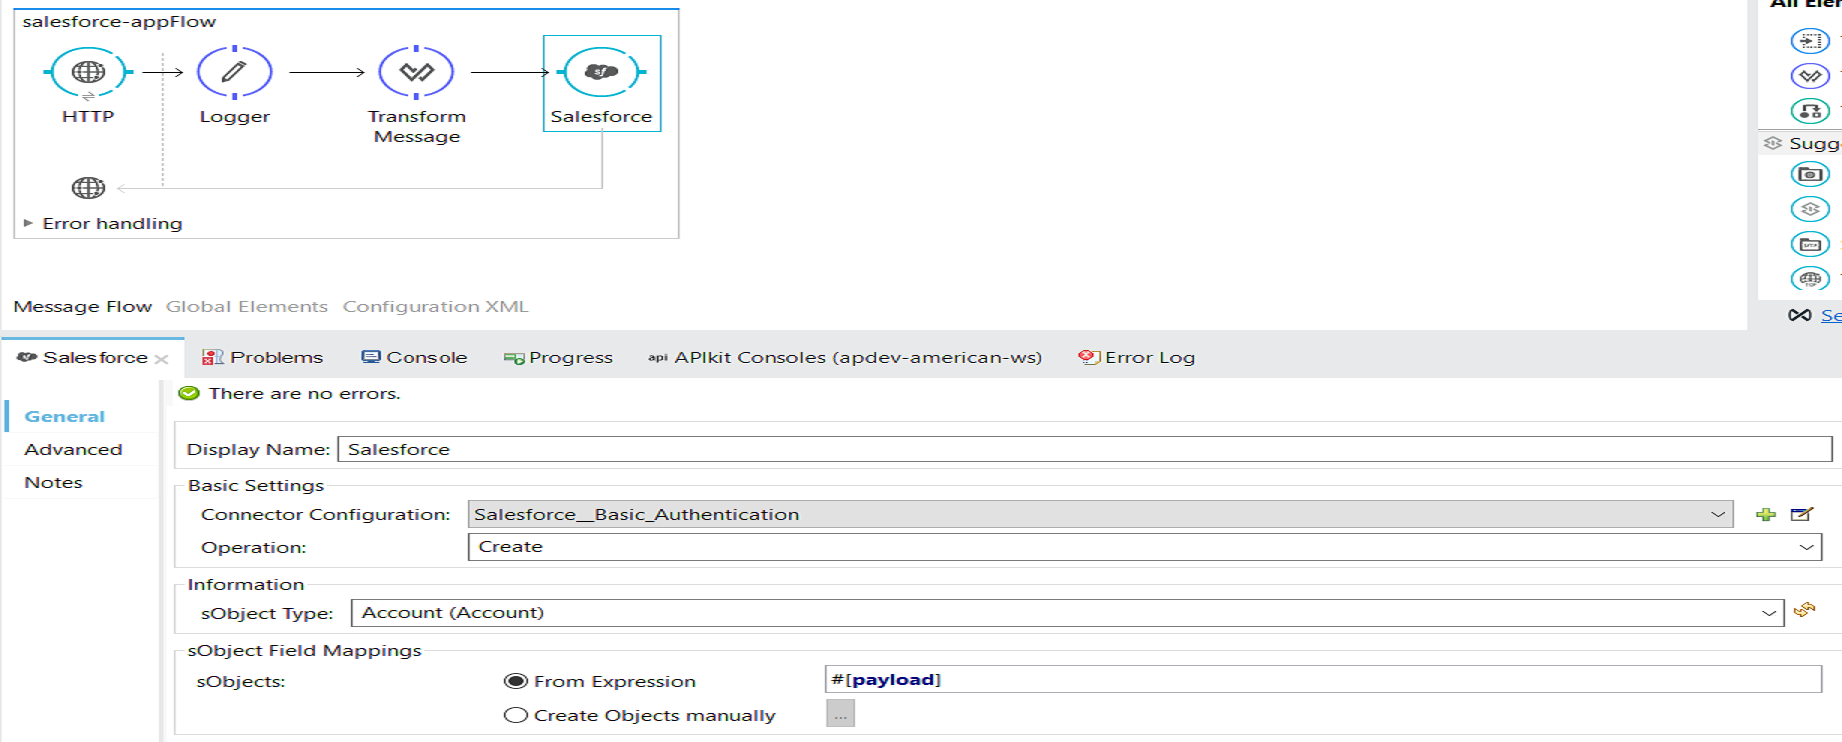
You can use HTTP Listener to receive messages and transform input messages using DataWeave in the required format to create accounts with a postal code in Salesforce.
Image title
<?xml version="1.0" encoding="UTF-8"?>
<mule
 xmlns:dw="http://www.mulesoft.org/schema/mule/ee/dw"
 xmlns:metadata="http://www.mulesoft.org/schema/mule/metadata"
 xmlns:http="http://www.mulesoft.org/schema/mule/http"
 xmlns:sfdc="http://www.mulesoft.org/schema/mule/sfdc"
 xmlns="http://www.mulesoft.org/schema/mule/core"
 xmlns:doc="http://www.mulesoft.org/schema/mule/documentation"
 xmlns:spring="http://www.springframework.org/schema/beans"
 xmlns:xsi="http://www.w3.org/2001/XMLSchema-instance"
xsi:schemaLocation="http://www.springframework.org/schema/beans http://www.springframework.org/schema/beans/spring-beans-current.xsd
http://www.mulesoft.org/schema/mule/core http://www.mulesoft.org/schema/mule/core/current/mule.xsd
http://www.mulesoft.org/schema/mule/http http://www.mulesoft.org/schema/mule/http/current/mule-http.xsd
http://www.mulesoft.org/schema/mule/sfdc http://www.mulesoft.org/schema/mule/sfdc/current/mule-sfdc.xsd
http://www.mulesoft.org/schema/mule/ee/dw http://www.mulesoft.org/schema/mule/ee/dw/current/dw.xsd">
 <http:listener-config name="HTTP_Listener_Configuration" host="0.0.0.0" port="8081" doc:name="HTTP Listener Configuration"/>
 <sfdc:config name="Salesforce__Basic_Authentication" username="" password="" securityToken="" doc:name="Salesforce: Basic Authentication"/>
 <flow name="salesforce-appFlow">
  <http:listener config-ref="HTTP_Listener_Configuration" path="/salesForce" allowedMethods="POST" doc:name="HTTP"/>
  <logger level="INFO" doc:name="Logger"/>
  <dw:transform-message metadata:id="f147a582-5125-4a5a-8d4a-ecb9c53b1705" doc:name="Transform Message">
   <dw:input-payload mimeType="application/json"/>
   <dw:set-payload>
    <![CDATA[%dw 1.0
%output application/java
---
[{
Name: payload.Name,
BillingStreet: payload.BillingStreet,
BillingCity: payload.BillingCity,
BillingState: payload.BillingState,
BillingPostalCode: payload.BillingPostalCode,
BillingCountry: payload.BillingCountry
}]]]>
   </dw:set-payload>
  </dw:transform-message>
  <sfdc:create config-ref="Salesforce__Basic_Authentication" type="Account" doc:name="Salesforce">
   <sfdc:objects ref="#[payload]"/>
  </sfdc:create>
 </flow>
</mule>
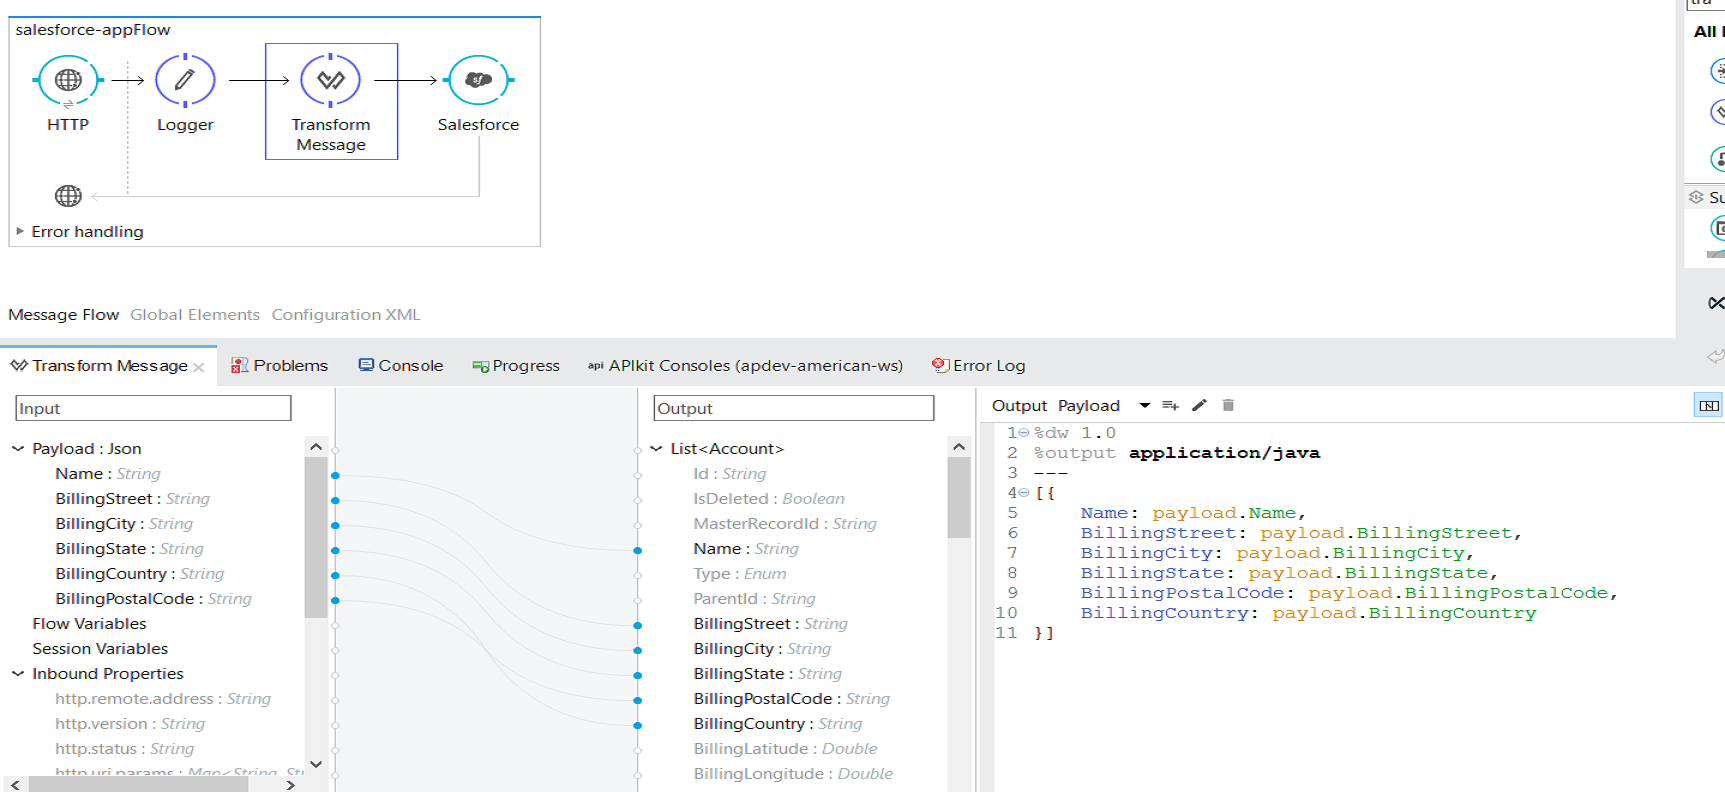
First, configure the SalesForce connector. Then, place the TransformMessage component before the SalesForce connector, as it will generate output metadata for TransformMessage automatically, depending on the configuration that we have done for the SalesForce connector.
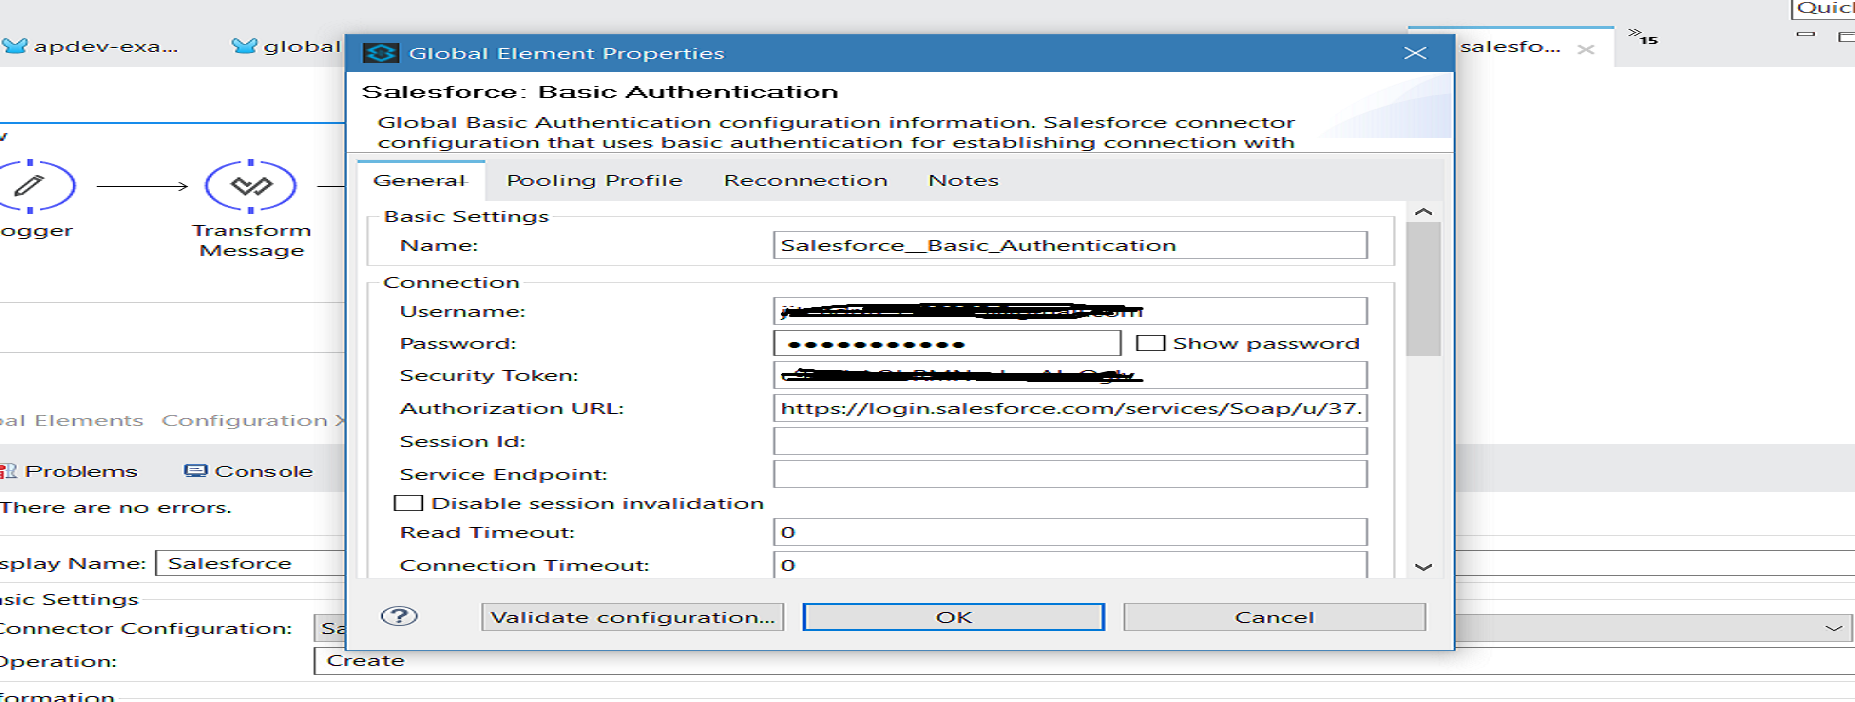
Now, set the Operation to Create, as you want to create an Accounts with Postal Code in Salesforce. Set the ObjectType to Account and click on Add Connector Configuration. It will open another window. Select Salesforce: Basic Authentication and provide your SalesForce account details like username and password with the security token that you received. You can validate your configuration by clicking Validate Configuration and finally pressing OK.
Image title
In TransformMessage, set up the input metadata (sample input file provided below). Output metadata will be generated as explained in this article above.
Image titleInput JSON example:
{
  "Name": "Donald Cook",
  "BillingStreet": "Baker Street",
  "BillingCity": "Mumbai",
  "BillingState": "Maharashtra",
  "BillingCountry": "India",
  "BillingPostalCode": "400710"
}

Testing the Application

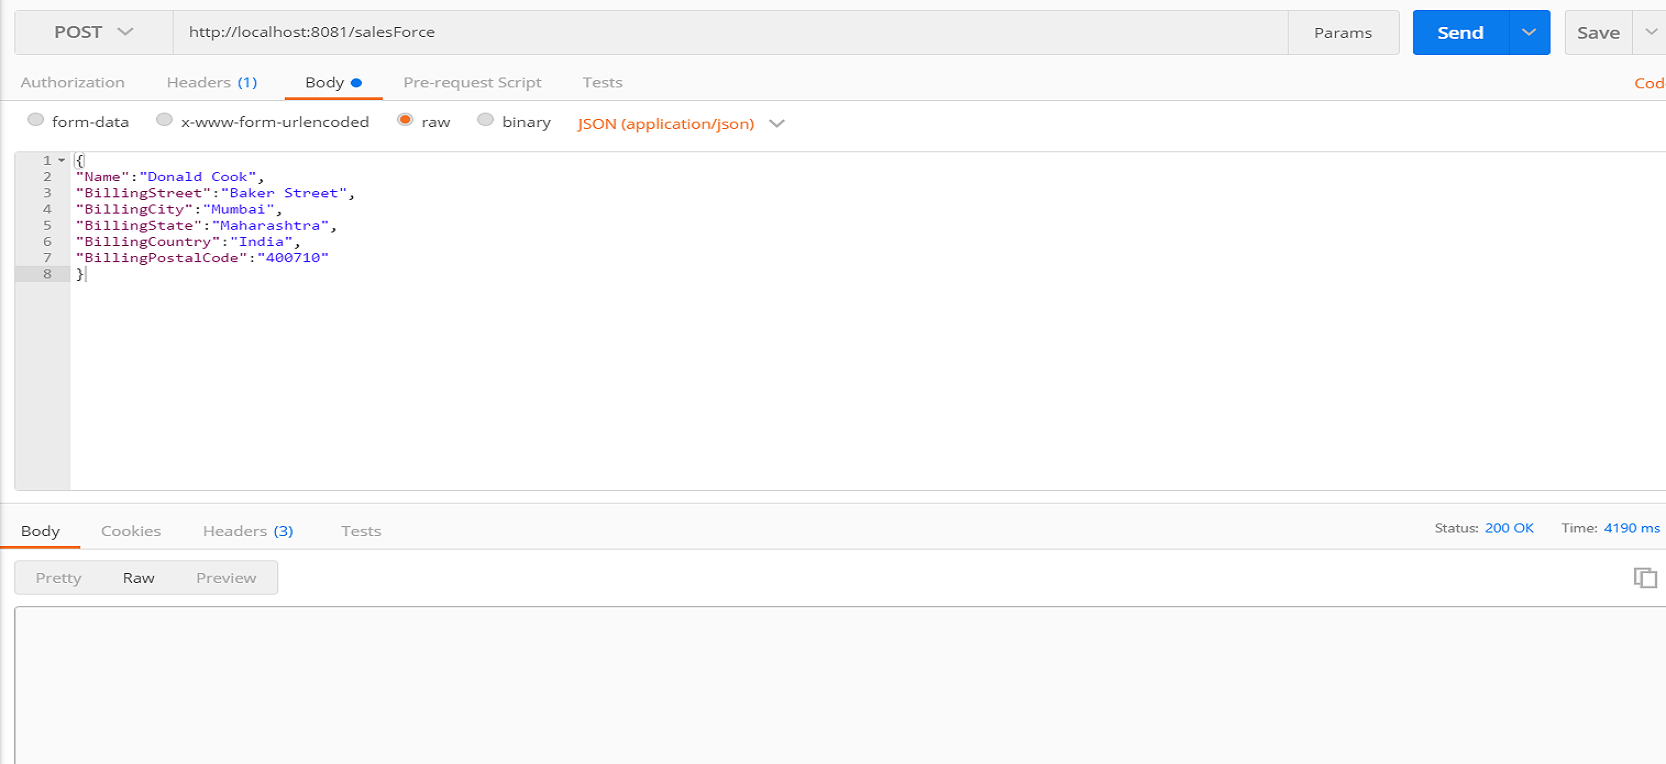
You can use Postman to post the message to the Mule application. It will transform the message and create an account in SalesForce.
Image title
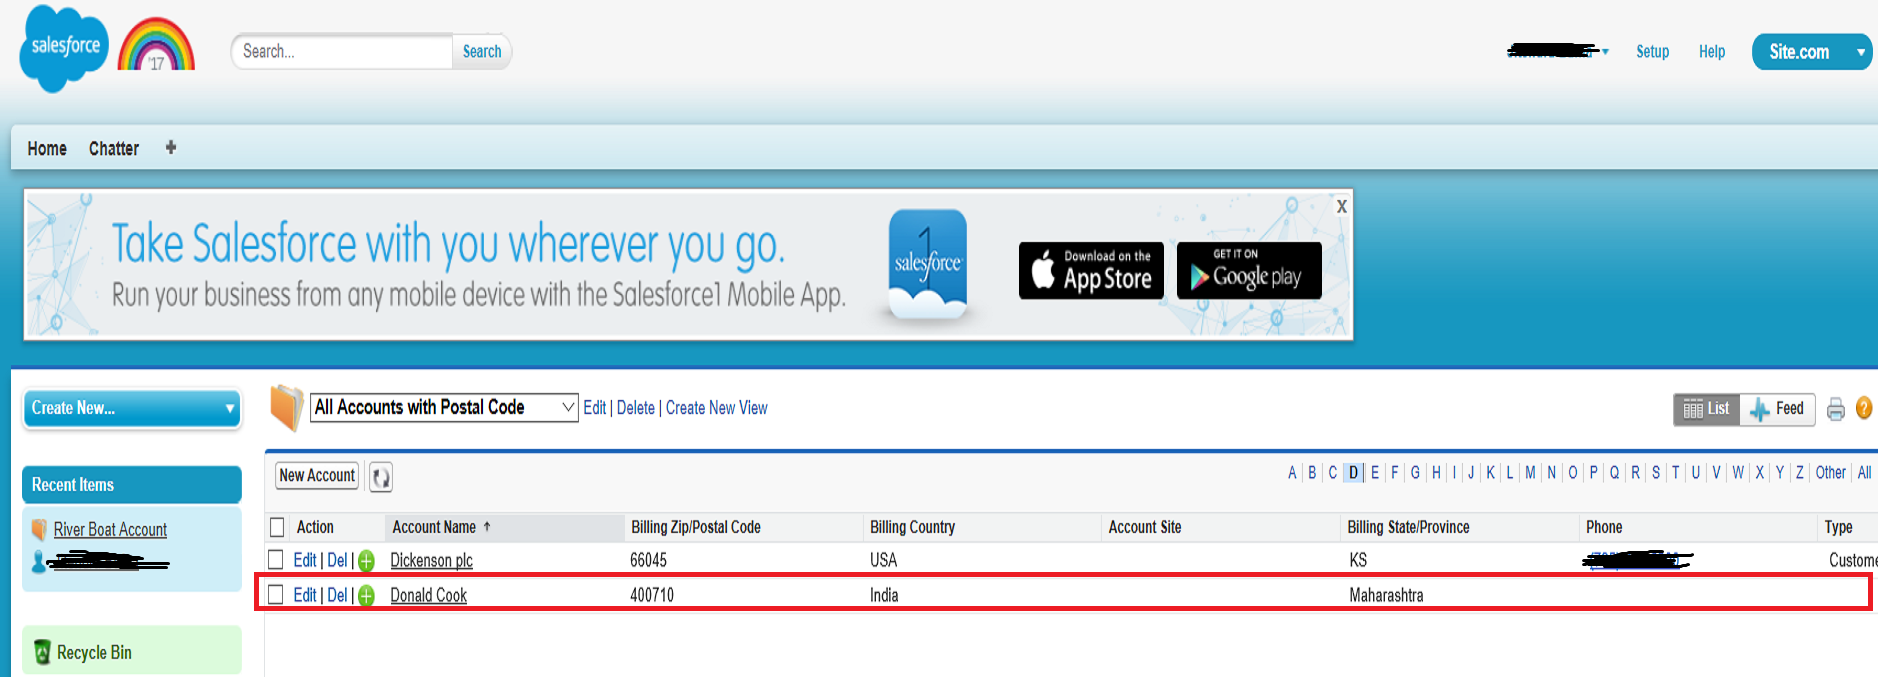
Now you can log into Salesforce and verify whether the account has been created.
Image title
Similarly, you can perform various operations such as querying, updating, deleting the records, and more. It also provides a facility called QueryBuilder to generate your query to read data from SalesForce.
I hope this article helps you in understanding how to integrate Salesforce with your Mule Application.