Saturday, 11 February 2017

Mulesoft Poll Options

Mulesoft polling is one of the most important features in Mulesoft. If you are dealing with large set of data or asynchronous workflow, polling architect is one of the best options to manage this scenario.
There are two options to configure Mulesoft poll scheduling.
  1. Fixed frequency scheduler – you can define polling time in frequency, start delay and time unit. This is one of the simplest ways to define your polling.
  2. Cron scheduler – Cron scheduler gives ability to use expression language and manage complex scheduling polling.
There is no relationship between two polling. This was challenge for me to get the relationship between two polling so that I can manage my data more efficiently.
Mulesoft gives couple of options to set up relationship between two polls.
Watermark – In polling there is always challenge to process newly created data and keep persist pointer for processed data to avoid duplicate processing. Mulesoft allows us as Watermark to persist this pointer in objectstore. Mule sets a watermark to a default value the first time the flow runs, then uses it as necessary when running a query or making an outbound request. Based on flow Mule may update the original value of the watermark or maintain the original value.
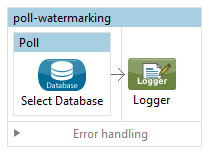
Here is simple flow to show how to implement watermark for poll
Poll Watermark Flow Diagram
poll-watermark
Here is code for this flow

<?xml version="1.0" encoding="UTF-8"?>
  <mule xmlns:schedulers="http://www.mulesoft.org/schema/mule/schedulers" xmlns:tracking="http://www.mulesoft.org/schema/mule/ee/tracking"
   xmlns:http="http://www.mulesoft.org/schema/mule/http" xmlns:mulexml="http://www.mulesoft.org/schema/mule/xml" xmlns="http://www.mulesoft.org/schema/mule/core" xmlns:doc="http://www.mulesoft.org/schema/mule/documentation"
   xmlns:spring="http://www.springframework.org/schema/beans"
   xmlns:xsi="http://www.w3.org/2001/XMLSchema-instance"
   xsi:schemaLocation="http://www.mulesoft.org/schema/mule/db http://www.mulesoft.org/schema/mule/db/current/mule-db.xsd
   http://www.springframework.org/schema/beans http://www.springframework.org/schema/beans/spring-beans-current.xsd
   http://www.mulesoft.org/schema/mule/core http://www.mulesoft.org/schema/mule/core/current/mule.xsd
   http://www.mulesoft.org/schema/mule/http http://www.mulesoft.org/schema/mule/http/current/mule-http.xsd
   http://www.mulesoft.org/schema/mule/xml http://www.mulesoft.org/schema/mule/xml/current/mule-xml.xsd
   http://www.mulesoft.org/schema/mule/ee/tracking http://www.mulesoft.org/schema/mule/ee/tracking/current/mule-tracking-ee.xsd
   http://www.mulesoft.org/schema/mule/schedulers http://www.mulesoft.org/schema/mule/schedulers/current/mule-schedulers.xsd">
  <spring:beans>
     <spring:bean id="dataSourceBean" name="dataSource_Bean" class="org.apache.commons.dbcp.BasicDataSource">
       <spring:property name="driverClassName" value="com.microsoft.sqlserver.jdbc.SQLServerDriver"/>
       <spring:property name="username" value="********"/>
       <spring:property name="password" value="********* "/>
       <spring:property name="url" value="jdbc:jtds:sqlserver://localhost:60520;Instance=CRM;DatabaseName=vanrish;domain=man;integrated security=false"/>
    </spring:bean>
 </spring:beans>
  <db:generic-config name="Generic_Database_Configuration" dataSource-ref="dataSourceBean" doc:name="Generic Database Configuration" >
     <reconnect-forever frequency="30000"/>
  </db:generic-config>
<flow name="poll-watermarking" processingStrategy="synchronous">
  <poll doc:name="Poll">
    <schedulers:cron-scheduler expression="0 22 12 * * ?"/>
    <watermark variable="serialNumber" default-expression="0" selector="LAST" selector-expression="#[payload.serialNumber]"/>
    <db:select config-ref="Generic_Database_Configuration" doc:name="Select Database">
       <db:dynamic-query><![CDATA[SELECT
MessageId, MessageType,SerialNumber,CreatedOn  FROM Message where SerialNumber  > #[Integer.parseInt(flowVars['serialNumber'])] order by SerialNumber asc]]></db:dynamic-query>
    </db:select>
 </poll>
   <logger message="#[flowVars['serialNumber']] == Hello this is Loggin Message == #[payload]" level="INFO" doc:name="Logger"/>
  </flow>
</mule>
Idempotent Filter – Idempotent filter is another way in Mule we can keep track between two polling. This filter ensures that only unique messages are received by a service by checking the unique ID of the incoming message. This filter also store unique id/pointer in objectstore in mule.
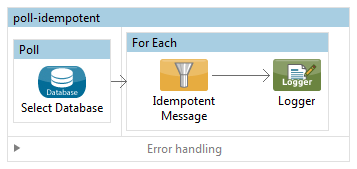
Here is simple flow to use Idempotent Filter
Poll Idempotent Filter flow Diagram
poll-idempotent
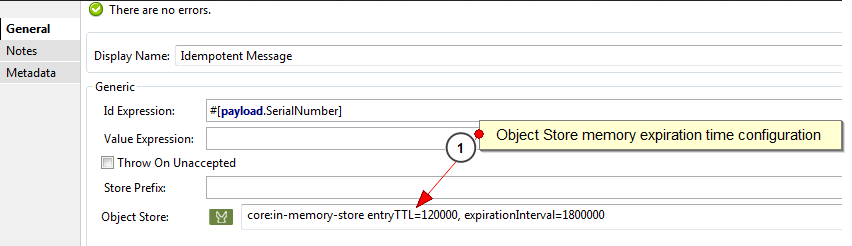
idempotent-objectStore
Here is code
<?xml version="1.0" encoding="UTF-8"?>
<mule xmlns:schedulers="http://www.mulesoft.org/schema/mule/schedulers" xmlns:tracking="http://www.mulesoft.org/schema/mule/ee/tracking" xmlns:db="http://www.mulesoft.org/schema/mule/db"
  xmlns:cassandradb="http://www.mulesoft.org/schema/mule/cassandradb" xmlns:http="http://www.mulesoft.org/schema/mule/http" xmlns:json="http://www.mulesoft.org/schema/mule/json" xmlns:mulexml="http://www.mulesoft.org/schema/mule/xml" xmlns="http://www.mulesoft.org/schema/mule/core" xmlns:doc="http://www.mulesoft.org/schema/mule/documentation"
  xmlns:spring="http://www.springframework.org/schema/beans"
  xmlns:xsi="http://www.w3.org/2001/XMLSchema-instance"
  xsi:schemaLocation="http://www.mulesoft.org/schema/mule/db http://www.mulesoft.org/schema/mule/db/current/mule-db.xsd
  http://www.springframework.org/schema/beans http://www.springframework.org/schema/beans/spring-beans-current.xsd
  http://www.mulesoft.org/schema/mule/core http://www.mulesoft.org/schema/mule/core/current/mule.xsd
  http://www.mulesoft.org/schema/mule/http http://www.mulesoft.org/schema/mule/http/current/mule-http.xsd
  http://www.mulesoft.org/schema/mule/xml http://www.mulesoft.org/schema/mule/xml/current/mule-xml.xsd
  http://www.mulesoft.org/schema/mule/ee/tracking http://www.mulesoft.org/schema/mule/ee/tracking/current/mule-tracking-ee.xsd
  http://www.mulesoft.org/schema/mule/schedulers http://www.mulesoft.org/schema/mule/schedulers/current/mule-schedulers.xsd">
    <spring:beans>
      <spring:bean id="dataSourceBean" name="dataSource_Bean" class="org.apache.commons.dbcp.BasicDataSource">
        <spring:property name="driverClassName" value="com.microsoft.sqlserver.jdbc.SQLServerDriver"/>
        <spring:property name="username" value="*******"/>
        <spring:property name="password" value="********"/>
        <spring:property name="url" value="jdbc:jtds:sqlserver://localhost:60520;Instance=CRM;DatabaseName=vanrish;domain=man;integrated security=false"/>
      </spring:bean>
    </spring:beans>
    <db:generic-config name="Generic_Database_Configuration" dataSource-ref="dataSourceBean" doc:name="Generic Database Configuration" >
      <reconnect-forever frequency="30000"/>
    </db:generic-config>
    <flow name="poll-idempotent" processingStrategy="synchronous">
      <poll doc:name="Poll">
        <fixed-frequency-scheduler frequency="10000"/>
        <db:select config-ref="Generic_Database_Configuration" doc:name="Select Database">
          <db:dynamic-query><![CDATA[SELECT  MessageId, MessageType,SerialNumber,CreatedOn  FROM Message order by SerialNumber asc]]></db:dynamic-query>
        </db:select>
      </poll>
      <foreach doc:name="For Each">
        <idempotent-message-filter idExpression="#[payload.SerialNumber]" doc:name="Idempotent Message">
          <in-memory-store entryTTL="120000" expirationInterval="1800000"/>
        </idempotent-message-filter>
        <logger message="#[payload.SerialNumber] == Hello this is Loggin Message == #[payload]" level="INFO" doc:name="Logger"/>
      </foreach>
    </flow>
  </mule>

DataWeave - A Language For Data Transformations

Data transformation is the process of converting data or information from one format to another, usually from the format of a source system into the required format of a new destination system. MuleSoft has developed “DataWeave” - a new language and module for querying and transforming data. DataWeave is a full-featured and fully native framework for querying and transforming data on Anypoint Platform.
In today’s enterprise infrastructure, system and application integration is more and more frequently a mission critical concern. There are number of Enterprise Service Bus (ESB) products available in the market today. These products can help you remove basic dependencies between applications by eliminating the need for one application to be aware of the other's location, but connectivity is not the only issue. In reality, most systems do not speak same language so Data transformation is one of the most important topic in Integration space.
Data transformation is the process of converting data or information from one format to another, usually from the format of a source system into the required format of a new destination system. MuleSoft has developed “DataWeave” - a new language and module for querying and transforming data. DataWeave is a full-featured and fully native framework for querying and transforming data on Anypoint Platform. Fully integrated with the graphical interface of Anypoint Studio and DataSense, DataWeave makes even the most complex data integration simple.
The DataWeave language supports a variety of transformations, from simple one-to-one mappings to more elaborate mappings including normalization, grouping, joins, deduplication, pivoting and filtering. It also supports XML, JSON, CSV, Java and EDI out of the box. The DataWeave Language is a powerful template engine that allows you to transform data to and from any kind of format (XML, CSV, JSON, Pojos, Maps, etc). It is fully integrated with Anypoint Studio, making on-ramp and continued development easy. It includes full integration with DataSense, allowing payload-aware development with auto-completion, auto-scaffolding of transforms, and live previews.
Let’s learn little bit more about the basics of this elegant and lightweight expression language. DataWeave files are divided into two main sections: 1) The Header, which defines directives (optional) and 2) The Body, which describes the output structure. Both sections are delimited by a separator, which is not required if no header is present. The separator consists of three dashes: "---".

Header
The DataWeave header contains the directives, these define high level information about your transformation. The structure of the Header is a sequence of lines, each with its own Directives. Through directives you can define:
  • DataWeave version
  • Input types and sources
  • Output type
  • Namespaces to import into your transform
  • Constants that can be referenced throughout the body
  • Functions that can be called throughout the body

Body
The body contains the expression that generates the output structure. Regardless of the types of the input and output, the data model for the output is always described in the standard DataWeave language, and this model that the transform executes. The data model of the produced output can consist of three different types of data:
  • Objects: represented as collection of key value pairs
  • Arrays: represented as a sequence of comma separated values
  • Simple literals
Let’s take a look at a simple example to understand more about DataWeave. In this example, we will first transform JSON input data to Java object and finally Java object to XML format.
Step 1. Import JSON Schema
Employee JSON Schema
{
  "title": "Employee Schema",
  "type": "object",
  "properties": {
    "emp_id": {
      "type": "integer"
    },
    "first_name": {
      "type": "string"
    },
    "last_name": {
      "type": "string"
    },
    "preferred_first_name": {
      "type": "string"
    },
    "preferred_last_name": {
      "type": "string"
    },"dob": {
      "type": "string"
    },
    "active": {
      "type": "string"
    },
    "addresses": {
      "type": "array",
      "items": {
        "type": "object",
        "properties": {
          "address_line1": {
            "type": "string"
          },
          "address_line2": {
            "type": "string"
          },
          "city": {
            "type": "string"
          },
          "state": {
            "type": "string"
          },
          "zip_code": {
            "type": "string"
          },
          "country": {
            "type": "string"
          }
        },
        "required": [
          "address_line1",
          "city",
          "state",
          "zip_code",
          "country"
        ]
      }
    },
    "contacts": {
      "type": "array",
      "items": {
        "type": "object",
        "properties": {
          "home": {
            "type": "string"
          },
          "cell": {
            "type": "string"
          },
          "fax": {
            "type": "string"
          },
          "primary_email": {
            "type": "string"
          },
          "secondary_email": {
            "type": "string"
          }
        }
      }
    }
  },
  "required": [
    "emp_id",
    "first_name",
    "last_name",
    "dob",
    "active"
  ]
}
Step 2. Import XML Schema
Employee XML Schema
<?xml version="1.0" encoding="UTF-8"?>
<schema xmlns="http://www.w3.org/2001/XMLSchema" xmlns:tns="http://www.example.org/xml_schema_employee/"
  targetNamespace="http://www.example.org/xml_schema_employee/">
  <element name="Employee" type="tns:Employee"></element>
  <complexType name="Employee">
    <sequence>
      <element name="empId" type="integer" maxOccurs="1" minOccurs="1">
      </element>
      <element name="firstName" type="string" maxOccurs="1"
        minOccurs="1">
      </element>
      <element name="middleName" type="string" maxOccurs="1"
        minOccurs="0">
      </element>
      <element name="lastName" type="string" maxOccurs="1"
        minOccurs="1">
      </element>
      <element name="preferredFullName" type="string" maxOccurs="1"
        minOccurs="0">
      </element>
      <element name="dateOfBirth" type="string" maxOccurs="1"
        minOccurs="1">
      </element>
      <element name="isActive" type="boolean" maxOccurs="1"
        minOccurs="1">
      </element>
      <element name="address" type="tns:Address" maxOccurs="unbounded"
        minOccurs="0">
      </element>
      <element name="contact" type="tns:Contact" maxOccurs="unbounded"
        minOccurs="0">
      </element>
    </sequence>
  </complexType>
  <complexType name="Address">
    <sequence>
      <element name="line1" type="string" maxOccurs="1" minOccurs="1">
      </element>
      <element name="line2" type="string" maxOccurs="1" minOccurs="0">
      </element>
      <element name="city" type="string" maxOccurs="1" minOccurs="1">
      </element>
      <element name="state" type="string" maxOccurs="1" minOccurs="1">
      </element>
      <element name="zip" type="string" maxOccurs="1" minOccurs="1">
      </element>
      <element name="country" type="string" maxOccurs="1"
        minOccurs="1"></element>
    </sequence>
  </complexType>
    <complexType name="Contact">
      <sequence>
        <element name="home" type="string" maxOccurs="1"
          minOccurs="0">
        </element>
        <element name="mobile" type="string" maxOccurs="1"
          minOccurs="0">
        </element>
        <element name="fax" type="string" maxOccurs="1"
          minOccurs="0">
        </element>
        <element name="email" type="tns:Email" maxOccurs="1"
          minOccurs="0">
        </element>
      </sequence>
    </complexType>
    <complexType name="Email">
      <sequence>
        <element name="primary" type="string" maxOccurs="1"
          minOccurs="0">
        </element>
        <element name="secondary" type="string" maxOccurs="1" minOccurs="0"></element>
      </sequence>
    </complexType>
</schema>
Step 3. Create Java Classes
Employee.java
import java.io.Serializable;
import java.util.ArrayList;
import java.util.Date;
import java.util.List;

public class Employee implements Serializable {

  private static final long serialVersionUID = 830974489967994125L;
  private Integer employeeId;
  private String firstName;
  private String middleName;
  private String lastName;
  private String preferredFullName;
  private Date dateOfBirth;
  private boolean active;
  private List<Address> addresses;
  private List<Contact> contacts;
  public Integer getEmployeeId() {
    return employeeId;
  }
  public void setEmployeeId(Integer employeeId) {
    this.employeeId = employeeId;
  }
  public String getFirstName() {
    return firstName;
  }
  public void setFirstName(String firstName) {
    this.firstName = firstName;
  }
  public String getMiddleName() {
    return middleName;
  }
  public void setMiddleName(String middleName) {
    this.middleName = middleName;
  }
  public String getLastName() {
    return lastName;
  }
  public void setLastName(String lastName) {
    this.lastName = lastName;
  }
  public Date getDateOfBirth() {
    return dateOfBirth;
  }
  public void setDateOfBirth(Date dateOfBirth) {
    this.dateOfBirth = dateOfBirth;
  }
  public boolean isActive() {
    return active;
  }
  public void setActive(boolean active) {
    this.active = active;
  }  
  public String getPreferredFullName() {
    return preferredFullName;
  }
  public void setPreferredFullName(String preferredFullName) {
    this.preferredFullName = preferredFullName;
  }
  public List<Address> getAddresses() {
    if (addresses == null) {
      addresses = new ArrayList<Address>();
    }
    return addresses;
  }  
  public void setAddresses(List<Address> addresses) {
    this.addresses = addresses;
  }
  public List<Contact> getContacts() {
    if (contacts == null) {
      contacts = new ArrayList<Contact>();
    }
    return contacts;
  }  
  public void setContacts(List<Contact> contacts) {
    this.contacts = contacts;
  }
}
Contact.java
import java.io.Serializable;

public class Contact implements Serializable {

    private static final long serialVersionUID = 8191183310915009265L;
    private String homePhone;
    private String cellPhone;
    private String fax;
    private Email email;

    public String getHomePhone() {
        return homePhone;
    }
    public void setHomePhone(String homePhone) {
        this.homePhone = homePhone;
    }
    public String getCellPhone() {
        return cellPhone;
    }
    public void setCellPhone(String cellPhone) {
        this.cellPhone = cellPhone;
    }
    public String getFax() {
        return fax;
    }
    public void setFax(String fax) {
        this.fax = fax;
    }
    public Email getEmail() {
        return email;
    }
    public void setEmail(Email email) {
        this.email = email;
    }
}
Address.java
import java.io.Serializable;

public class Address implements Serializable {

    private static final long serialVersionUID = -4178015379362625254L;
    private String line1;
    private String line2;
    private String city;
    private String state;
    private String zipCode;
    private String country;

    public String getLine1() {
        return line1;
    }
    public void setLine1(String line1) {
        this.line1 = line1;
    }
    public String getLine2() {
        return line2;
    }
    public void setLine2(String line2) {
        this.line2 = line2;
    }
    public String getCity() {
        return city;
    }
    public void setCity(String city) {
        this.city = city;
    }
    public String getState() {
        return state;
    }
    public void setState(String state) {
        this.state = state;
    }
    public String getZipCode() {
        return zipCode;
    }
    public void setZipCode(String zipCode) {
        this.zipCode = zipCode;
    }
    public String getCountry() {
        return country;
    }
    public void setCountry(String country) {
        this.country = country;
    }
}
Email.java
import java.io.Serializable;

public class Email implements Serializable {

    private static final long serialVersionUID = 6412135990330505529L;
    private String primary;
    private String secondary;

    public String getPrimary() {
        return primary;
    }
    public void setPrimary(String primary) {
        this.primary = primary;
    }
    public String getSecondary() {
        return secondary;
    }
    public void setSecondary(String secondary) {
        this.secondary = secondary;
    }
}
Step 4. Write Mule Flow in Anypoint Studio
Step 5. Write XML to Java Transformation
DW Transformation (XML to Java)
%dw 1.0
%output application/java
---
{
  active: payload.active as :boolean,
  addresses: payload.addresses map ((address , indexOfAddress) -> {
    city: address.city,
    country: address.country,
    line1: address.address_line1,
    line2: address.address_line2,
    state: address.state,
    zipCode: address.zip_code
  }),
  contacts: payload.contacts map ((contact , indexOfContact) -> {
    cellPhone: contact.cell,
    email: {
      primary: contact.primary_email,
      secondary: contact.secondary_email
    },
    fax: contact.fax,
    homePhone: contact.home
  }),
  dateOfBirth: payload.dob as :date { format: "yyyyMMdd"},
  employeeId: payload.emp_id,
  firstName: payload.first_name,
  lastName: payload.last_name,
  preferredFullName: payload.preferred_first_name ++ " " ++ payload.preferred_last_name
} as :object {
  class : "com.appnovation.dataweave.example.Employee"
} 
Step 6. Write Java to Json Transformation
DW Transformation (Java to XML)
%dw 1.0
%output application/xml
%namespace ns0 http://www.example.org/xml_schema_employee/
---
{
  ns0#Employee: {
    empId: payload.employeeId,
    firstName: payload.firstName,
    middleName: payload.middleName,
    lastName: payload.lastName,
    preferredFullName: payload.preferredFullName,
    dateOfBirth: payload.dateOfBirth as :string,
    isActive: payload.active,
    (payload.contacts map ((contact , indexOfContact) -> {
      contact: {
        mobile: contact.cellPhone,
        home: contact.homePhone,
        fax: contact.fax,
        email: {
          primary: contact.email.primary,
          secondary: contact.email.secondary
        }
      }
    })),
    (payload.addresses map ((address , indexOfAddress) -> {
      address: {
        line1: address.line1,
        line2: address.line2,
        city: address.city,
        state: address.state,
        zip: address.zipCode,
        country: address.country
      }
    }))
  }
}  
Step 7. Input and Output
Input Data (JSON Format)
{
  "emp_id": 112233,
  "first_name": "sudheer",
  "last_name": "lakkireddr",
  "dob": "19900307",
  "preferred_first_name": "sudheer",
  "preferred_last_name": "lakkireddy",
  "active": true,
  "addresses": [
    {
      "address_line1": "120 Spanish",
      "address_line2": "A",
      "city": "San Francisco",
      "state": "California",
      "zip": "94100",
      "country": "USA"
    },
    {
      "address_line1": "120 Encanto",
      "address_line2": "B",
      "city": "St Louis",
      "state": "Missouri",
      "zip_code": "63001",
      "country": "USA"
    }
  ],
  "contacts": [
    {
      "home": "111-111-1111",
      "cell": "222-222-2222",
      "fax": "333-333-3333",
      "primary_email": "a@primary.com",
      "secondary_email": "b@secondary.com"
    },
    {
      "home": "555-555-5555"
    }
  ]
} 
Output Data (XML Format)
<?xml version='1.0' encoding='UTF-8' ?>
<ns0:Employee xmlns:ns0="http://www.example.org/xml_schema_employee/">
    <empId>112233</empId>
    <firstName>Sagar</firstName>
    <middleName xmlns:xsi="http://www.w3.org/2001/XMLSchema-instance" xsi:nil="true"/>
    <lastName>Sudheer</lastName>
    <preferredFullName>Lakkireddy</preferredFullName>
    <dateOfBirth>1990-03-07T00:00:00</dateOfBirth>
    <isActive>true</isActive>
    <contact>
        <mobile>222-222-2222</mobile>
        <home>111-111-1111</home>
        <fax>333-333-3333</fax>
        <email>
            <primary>a@primary.com</primary>
            <secondary>b@secondary.com</secondary>
        </email>
    </contact>
    <contact>
        <mobile xmlns:xsi="http://www.w3.org/2001/XMLSchema-instance" xsi:nil="true"/>
        <home>555-555-5555</home>
        <fax xmlns:xsi="http://www.w3.org/2001/XMLSchema-instance" xsi:nil="true"/>
        <email>
            <primary xmlns:xsi="http://www.w3.org/2001/XMLSchema-instance" xsi:nil="true"/>
            <secondary xmlns:xsi="http://www.w3.org/2001/XMLSchema-instance" xsi:nil="true"/>
        </email>
    </contact>
    <address>
        <line1>120 Spanish</line1>
        <line2>A</line2>
        <city>San Francisco</city>
        <state>California</state>
        <zip xmlns:xsi="http://www.w3.org/2001/XMLSchema-instance" xsi:nil="true"/>
        <country>USA</country>
    </address>
    <address>
        <line1>120 Encanto</line1>
        <line2>B</line2>
        <city>St Louis</city>
        <state>Missouri</state>
        <zip>63001</zip>
        <country>USA</country>
    </address>
</ns0:Employee>

Monday, 6 February 2017

How to Use Groovy in a Mule Application

Mule ESB has been arguably the most popular and efficient open source Enterprise Service Bus (ESB) available in market and its rich options of connectors, routers, filters, error handlers, transformers supporting multiple languages like javaJavaScriptgroovypython and ruby has elevated it as the indisputable ESB of the digital era. In September 2016, Forbes released its first ever top 100 private cloud companies in the world and Mulesoft was ranked 20th in the report. Mulesoft was the only company to feature in both magic quadrants for Application Services Governance and Enterprise Integration Platform as a Service (iPaaS) in Gartner report released in April 2015 and March 2016 respectively. This highlights Mulesoft’s rapid growth and its stronghold in integration division helping organisations for the digital transformation.
Apache Groovy is a powerful object oriented programming language for Java platform. Its simplicity, dynamicity and easy to learn syntax had made it as the preferred scripting language for developers. We will implement groovy script in a Mule flow to demonstrate the smooth integration of groovy script in a Mule application.
Pre-Requisites:
  1. Basic working knowledge on Mule ESB development using Anypoint Studio.
  2. Basic knowledge on any object-oriented programming language is an added advantage.
In this simple example, we will build a Mule application with a HTTP listener which will be inputted with the below query parameters
  • Name
  • Parameter1
  • Parameter2
The Mule application will be configured with a groovy component which will print the sum of parameter 1 and parameter 2 as the response.
Mule Flow:
Mule flow Groovy
HTTP Inbound Endpoint:
A HTTP inbound endpoint is created by dragging the HTTP connector component from the palette to the canvas. A HTTP connector configuration is created which will listen to localhost on port 8081 and the path in which the resource can be accessed will be “groovy”.
http-inbound-endpoint
Session Variables:
We will have 3 session variable components to extract the query parameters from the input url and save it to session variables configured in the flow.
Mule Session Variable
Mule Session variable
Mule session variable
Groovy:
A groovy component is placed next to the session variable components in which we sum up the values of parameters passed.
Mule groovy
Note: We need to use toInteger() function to convert the string into integer. When the query parameter is assigned to the session variable its data type is string. In order to convert the string to integer we use the toInterger() function.
Logger:
We will use a logger to log the values of the session variables in the console.
Mule logger
Set Payload:
We will place a Set Payload component to complete the Mule flow. The Set Payload component will print the message in the following format as output.
Hello “Name” !!! The sum of “Parameter1” and “Parameter2” is “Sum” !!!
Mule set-payload
Testing the Mule flow:
It’s time to test the Mule application we have built. We can use any browser or tools like SOAP UI and Postman Chrome plug-in which is capable of posting a HTTP request. Using chrome browser, try to post the following: localhost:8081/groovy?name=sudheer&parameter1=4&parameter2=65
Mule testing
Mule logger-output