We often expose the proxy APIs that connect applications to their backend APIs.
With a proxy API, the application continues to run without issue and
continues to call and connect to the backend API while a developer is
editing it. Exposing a proxy API also protects the backend API from the
world, shielding the real IP address.
The advantage of using a proxy is having a layer of separation to ensure that any attacks against our API are stopped well before anyone interacts with our main servers. This creates extra protection for our existing APIs.
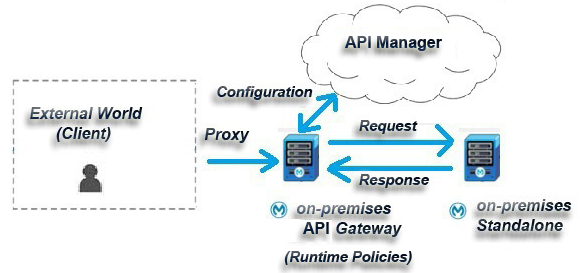
API Gateway acts as a proxy server that is dedicated to hosting the proxy applications and for Lightning Connect to gather all the existing backend APIs together which are either hosted in our on-premises standalone server or CloudHub.
The advantage of API Gateway is that it automatically creates an application that can proxy the backend API from the URL that the backend API exposes, and we do not need to write any code for it. Not only that, through API Manager, we can implement various runtime policies on HTTP/HTTPS endpoints to govern our proxy API.
API Gateway solution is also very versatile, as it can be implemented both in CloudHub as well as in on-premises.
Here we will demonstrate implementing a proxy application on an on-premises Data Gateway server that will connect/communicate with a backend API that is deployed on an on-premises standalone server with a runtime policy.
First, we start the demonstration by creating a simple application in our studio and deploying it on our on-premises standalone server. We then create our proxy application in the API Manager interface, apply the required policies on it, and finally deploy the proxy application to an on-premises API Gateway in our system.
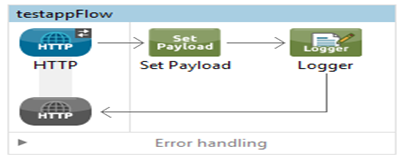
Once it is finished, we create a Mule application deployable zip file as follows:

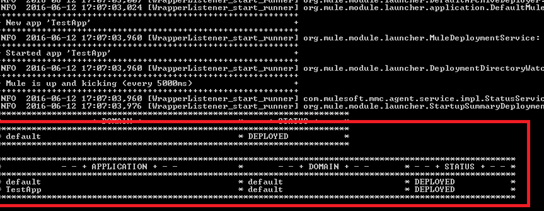
After the zip file is created we will copy the zip file in the {MULE_HOME}/apps folder and deploy the application in the on-premises standalone server as follows:
Now, if we test our application on a REST client like Postman, we can see the following responses with the following URL http://localhost:9091/testapp :
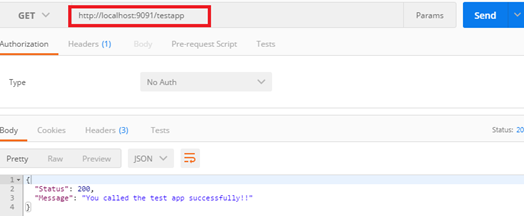
This means our backend application is ready and running successfully on an on-premises standalone server!
We will be configuring the proxy application, and it’s policies via the API Manager interface. To begin the process, we need to log in to our Anypoint Platform account to access the interface.
After we create an API, we will see that API Manager provided an option to configure our endpoints:

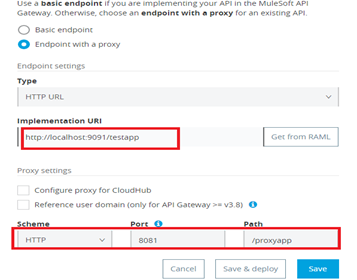
As we select the configure endpoint option, we will find options like implementation URI asking for a backend service URL and down the line port and path for the proxy application:

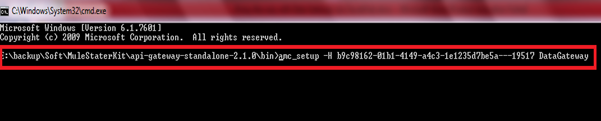
Now we move to the /bin folder of our on-premises Data Gateway server located in our system and add the above-given command in command prompt and execute it as follows:
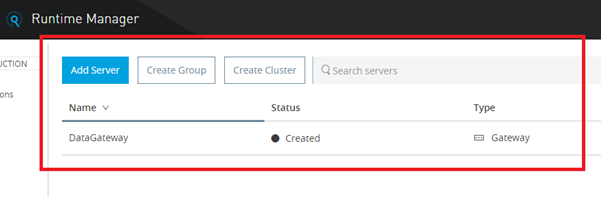
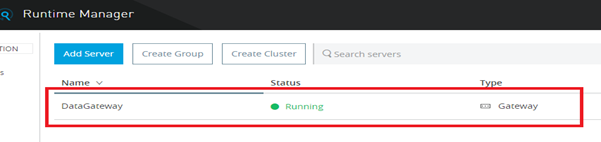
Now, we will find that our Data Gateway is successfully added to our Runtime Manager interface as below:
So, if we start our on-premises Data Gateway server in our system it will reflect in our Runtime Manager interface as below:
A policy is a mechanism/rule for enforcing filters on traffic. These filters are used to control things like authentication, access, allotted consumption, and SLAs. There can be custom policies or some pre-built policies like Rate Limiting, Throttling, OAuth 2, Basic HTTP Authentication, and etc… for APIs:

We are going to apply the Rate Limiting policy on our proxy application as shown above.
The Rate Limiting policy specifies the maximum value for the number of messages processed per period and rejects any messages beyond the maximum. Therefore, it will apply rate limiting to all API calls regardless of the source and thus control our proxy API.

So, here we will configure two requests for our proxy API per minute as we can see above.
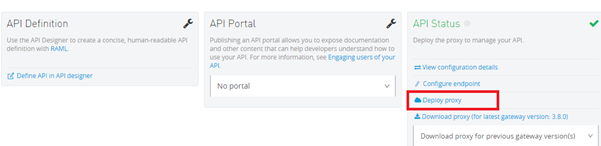
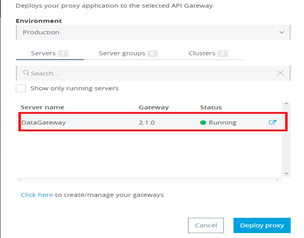
We need to select our on-premises Data Gateway proxy server which is just registered with the API Manager interface and then we need to click Deploy Proxy button as shown below:
The API Manager interface will directly deploy our proxy application to our on-premises Data Gateway server located in our system and will show the status as follows:
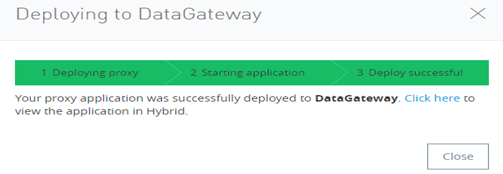
We can also see the change in our system in the Gateway server console:

So, we will hit the proxy URL: http://localhost:8081/proxyapp on a REST client like Postman as follows and see the result:
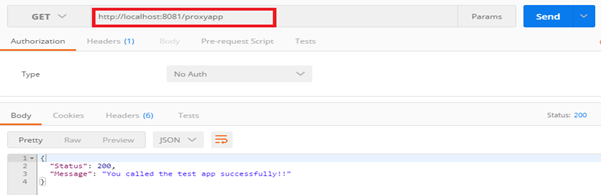
And voila! We are getting the response from our backend API!
The advantage of using a proxy is having a layer of separation to ensure that any attacks against our API are stopped well before anyone interacts with our main servers. This creates extra protection for our existing APIs.
API Gateway acts as a proxy server that is dedicated to hosting the proxy applications and for Lightning Connect to gather all the existing backend APIs together which are either hosted in our on-premises standalone server or CloudHub.
The advantage of API Gateway is that it automatically creates an application that can proxy the backend API from the URL that the backend API exposes, and we do not need to write any code for it. Not only that, through API Manager, we can implement various runtime policies on HTTP/HTTPS endpoints to govern our proxy API.
API Gateway solution is also very versatile, as it can be implemented both in CloudHub as well as in on-premises.
Here we will demonstrate implementing a proxy application on an on-premises Data Gateway server that will connect/communicate with a backend API that is deployed on an on-premises standalone server with a runtime policy.
First, we start the demonstration by creating a simple application in our studio and deploying it on our on-premises standalone server. We then create our proxy application in the API Manager interface, apply the required policies on it, and finally deploy the proxy application to an on-premises API Gateway in our system.
Creating and Deploying Application
So, let’s create a sample application in our studio as follows:Once it is finished, we create a Mule application deployable zip file as follows:
After the zip file is created we will copy the zip file in the {MULE_HOME}/apps folder and deploy the application in the on-premises standalone server as follows:
Now, if we test our application on a REST client like Postman, we can see the following responses with the following URL http://localhost:9091/testapp :
This means our backend application is ready and running successfully on an on-premises standalone server!
Creating Proxy Application for Standalone Data Gateway Server
Now as our backend service is ready and running on an on-premises standalone server, we don’t want to expose this API URL to the world. Instead, we can deploy a proxy service to our on-premises proxy server which we can then finally expose to the outside world. Additionally, we should apply some policies or rules with this proxy URL that is exposed to the client.We will be configuring the proxy application, and it’s policies via the API Manager interface. To begin the process, we need to log in to our Anypoint Platform account to access the interface.
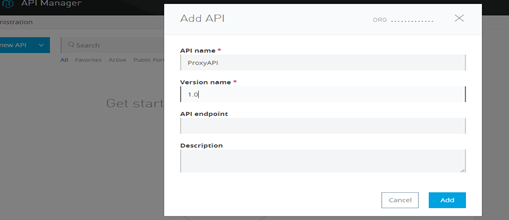
Creating a Proxy Application
We need to go to the API Manager and create an API as follows:After we create an API, we will see that API Manager provided an option to configure our endpoints:
As we select the configure endpoint option, we will find options like implementation URI asking for a backend service URL and down the line port and path for the proxy application:
Adding On-Premises DataGateway Server to CloudHub
In the server section we can add our on-premises Data Gateway server with the Runtime Manager interface:Now we move to the /bin folder of our on-premises Data Gateway server located in our system and add the above-given command in command prompt and execute it as follows:
Now, we will find that our Data Gateway is successfully added to our Runtime Manager interface as below:
So, if we start our on-premises Data Gateway server in our system it will reflect in our Runtime Manager interface as below:
Applying Policies to Our Proxy Application
Now, back to the API Manager where we configured our proxy application, we will find an option to apply different policies on it.A policy is a mechanism/rule for enforcing filters on traffic. These filters are used to control things like authentication, access, allotted consumption, and SLAs. There can be custom policies or some pre-built policies like Rate Limiting, Throttling, OAuth 2, Basic HTTP Authentication, and etc… for APIs:
We are going to apply the Rate Limiting policy on our proxy application as shown above.
The Rate Limiting policy specifies the maximum value for the number of messages processed per period and rejects any messages beyond the maximum. Therefore, it will apply rate limiting to all API calls regardless of the source and thus control our proxy API.
So, here we will configure two requests for our proxy API per minute as we can see above.
Deploying Proxy Application From API Manager Interface to On-Premises Server Directly
After applying the Rate Limiting policy, we will deploy the proxy application from API Manager interface to directly our on-premises Data Gateway server by selecting Deploy Proxy option we can see below:We need to select our on-premises Data Gateway proxy server which is just registered with the API Manager interface and then we need to click Deploy Proxy button as shown below:
The API Manager interface will directly deploy our proxy application to our on-premises Data Gateway server located in our system and will show the status as follows:
We can also see the change in our system in the Gateway server console:
Testing Our Proxy API
In the final stage, we will now test our proxy application deployed in our proxy server as well as the policy/rule applied on it.So, we will hit the proxy URL: http://localhost:8081/proxyapp on a REST client like Postman as follows and see the result:
And voila! We are getting the response from our backend API!
Testing the Rule Applied on Proxy API
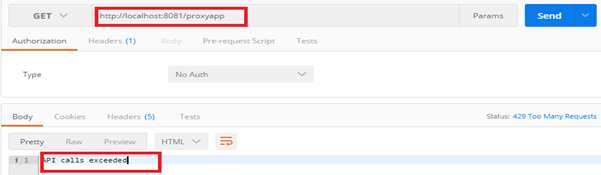
As we already implemented a Rate Limiting policy on our proxy API, if we hit more than two requests per minute we will get the following restriction below:Adding Version
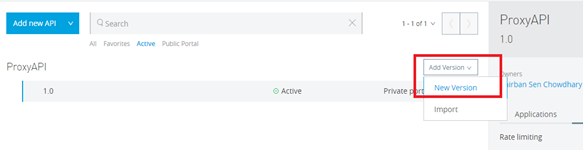
API Manager has a major feature of adding versions to our proxy APIs. This helps to maintain backward compatibility across different API versions. We can also add different versions of our proxy APIs, each of which will be compatible with former versions of the backend API:
Thank you for sharing wonderful information with us to get some idea about that content.
ReplyDeleteMulesoft Training in Bangalore
Best Mulesoft Online Training
Nice and good article. It is very useful for me to learn and understand easily. Thanks for sharing
ReplyDeleteMule 4 Training
Best Mulesoft Online Training